
Groups on Facebook are very popular nowadays. They are a great way to build a community around a particular topic or purpose.
A Facebook group is a collection of people with a common interest, like a forum. If you want to build your business, it’s a smart move to create a Facebook group. Facebook groups offer you many opportunities to help connect with your target customers.
Today, we’ll tell you how to create, leave, archive, and delete a Facebook group in this post.
Contents
- 1 How to Create a Facebook Group (Desktop)?
- 2 How to Create a Facebook Group on iPhone and Android?
- 3 How to Leave a Facebook Group?
- 4 How to Leave a Facebook Group on iPhone and Android?
- 5 How to Archive a Facebook Group?
- 6 How to Delete a Facebook Group?
- 7 How to Delete a Facebook Group on iPhone and Android?
- 8 How to Pause a Facebook Group?
How to Create a Facebook Group (Desktop)?
- Sign in to your Facebook account and visit ‘Groups’ from the left pane of home screen.
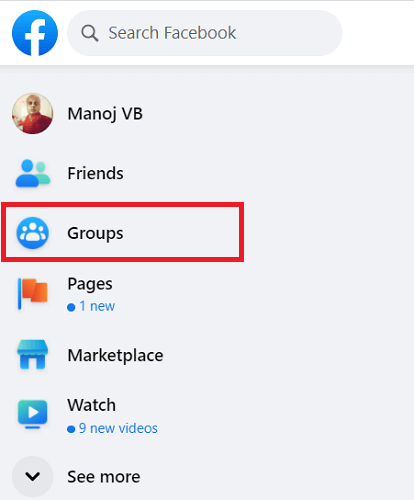
2. Tap ‘Create new group’ button.

3. A new page will open like this,
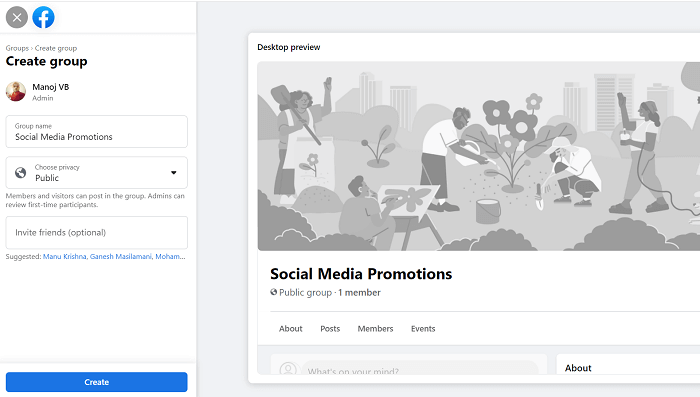
Enter your Group name first. Set a privacy level as next. There are two types of privacy levels for Facebook groups.
Public: Anyone can see group members and posts
Private: Only group members can see other members and their posts
Invite your friends if needed. You can skip this step and add more members at a later moment also. Finally, click on Create.
Facebook will create your new group and redirect to another screen.
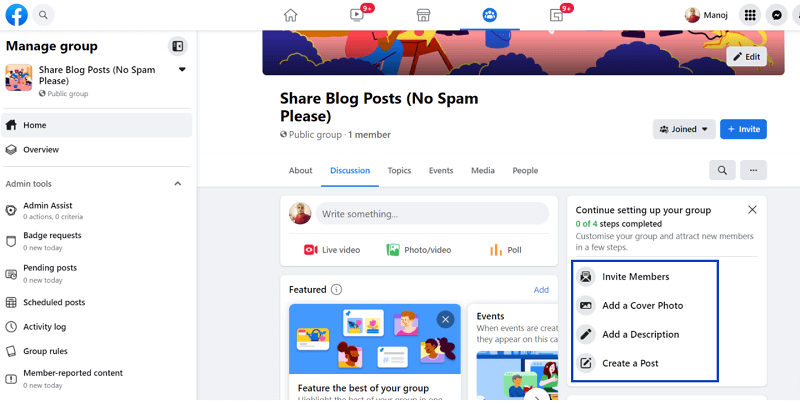
There are certain things you should do for setting up the group. Add a cover photo that can better represent your group topic. Inform visitors about the purpose of creating the group through a description.
Click ‘Invite Members’ option to invite your friends to join the group and contribute.
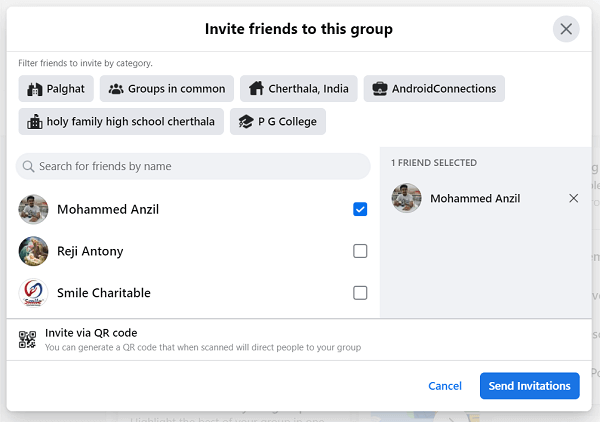
You can filter friends by location, work place, college, and common interests. Alternatively, enter a friend’s name in the search box to quickly locate a name. Check boxes that appear next to them and send invitations.
QR code is another way to send invitations. Click ‘Invite via QR code’ option to generate your group QR code and send. People can scan it using a mobile phone camera or a QR code scanner to join your group directly.
How to Create a Facebook Group on iPhone and Android?
- Open Facebook app on your smartphone.
- Click people icon on the top to visit and manage your groups.
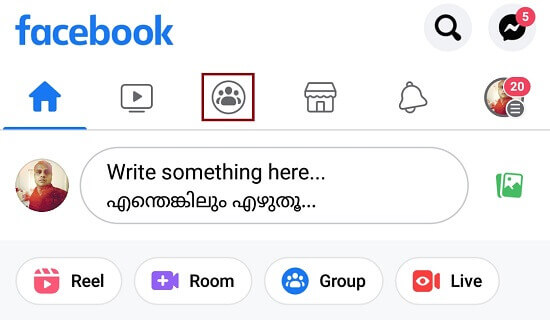
3. Tap the ‘+’ icon to create a new group.
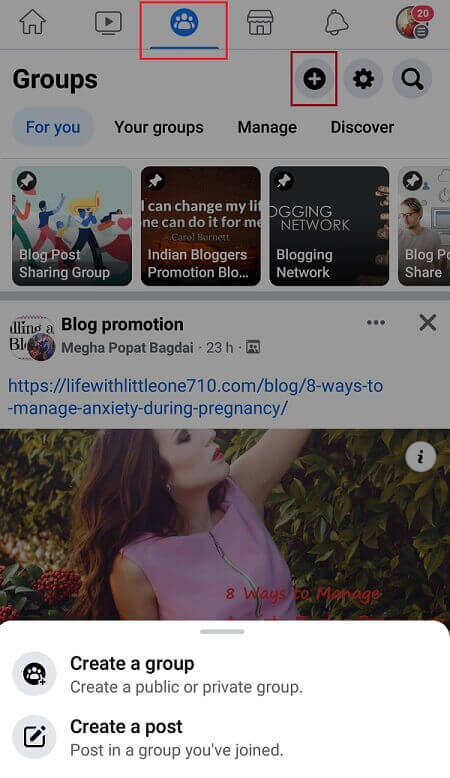
A slide menu will appear from the bottom. Choose the first option – Create a group.
Facebook will direct you to another page. Enter your group name and choose a privacy level. Tap ‘Create group’ button to create.
That’s it.
How to Leave a Facebook Group?
- Visit Facebook and head to a group to leave.
- Click on the drop-down arrow that appears next to ‘Joined’ on the top.
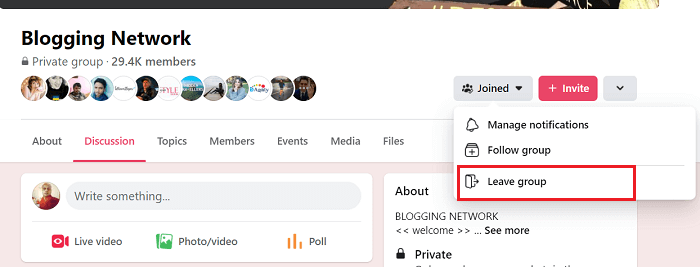
A menu will slide down. If your problem is frequent notifications from the group, no need to leave the group. All you have to do is disable notifications. Choose Manage notifications and turn off all kinds of notifications.
If you don’t want to continue in the group, choose the Leave group option. Tap Leave group button again on the pop-up box to confirm your request.
How to Leave a Facebook Group on iPhone and Android?
- Open Facebook app on your mobile.
- Click the people icon on the top to visit groups. Head to a group that you want to leave.

Tap the ‘three-dots icon’ from the top-right corner. Then, a menu will serve from the bottom of your screen.
3. Choose ‘Leave group’.
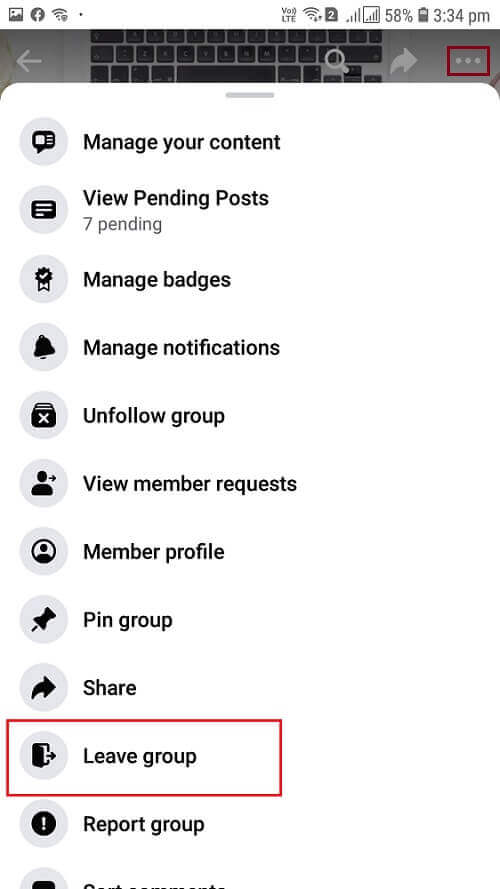
Confirm your request to leave.
Done.
How to Archive a Facebook Group?
Facebook has recently removed the archive option from the “more” menu. But still, you can archive a group. New members cannot join an archived group, nor can existing members post new content. But members can see the old posts.
Let us check how it works,
Sign in to a Facebook group to archive. I assume you are the only one admin of the group. If there are multiple admins, remove them. Otherwise, you will not be able to perform group archiving.
To remove a Facebook group admin, follow these steps.
- Switch to the “Members” tab in your group.
- Click “three-dots” icon that appears next to an admin profile.
- Choose “Remove as admin” option.
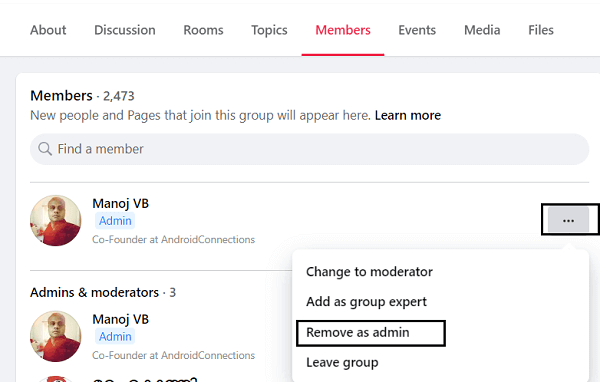
Repeat this step for all other admins. Finally, you will get a notification that you are only one admin of the group. Now you can archive Facebook group in 1-2-3 steps.
- Click “Joined” from the right side of your group menu.
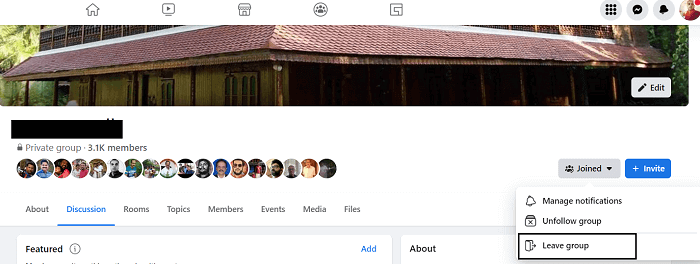
A drop-down menu will appear. Pick “Leave group” from the list.
2. Since you are the single admin, it will ask you to add a new admin to manage the group. Just skip this step. Click on “Next”.
3. An admin is essential for a Facebook group. Otherwise, any of the group members can promote themselves as admin. Facebook will automatically archive a group if there is no admin for a while.
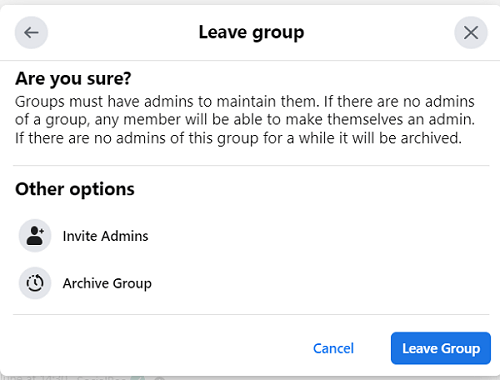
But if you do not want to go ahead with the group, it is better to archive it soon. Select “Archive Group” option to proceed.
A notification like this will appear instantly on the top of your group,

That’s it. Your group is successfully archived.
How to Delete a Facebook Group?
Facebook groups do not have a direct delete option. Instead, you should remove all members one by one. Then, leave yourself. The group will be automatically deleted as there are no members.
- Sign in to Facebook using a browser.
- Visit your group.
- Head to the Members tab,

It will list all your group members. Hit the ‘three-dots’ icon next to each member, and select ‘remove member’ option to remove them from your group. When finished, leave yourself by choosing leave group option.
4. Then, you will get a pop-up box.
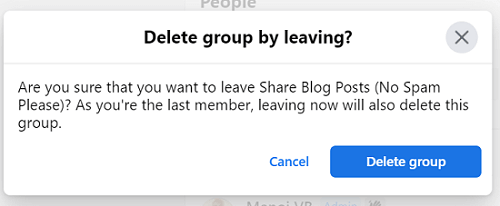
Hit Delete group button to delete your group.
How to Delete a Facebook Group on iPhone and Android?
- Open Facebook app on your iPhone or Android device.
- Visit a Facebook group (admin privileges) that you want to delete.

Click the three dots icon near the invite button to view all group members.
3. Remove members one by one (Name > Three-dots icon> Remove member)
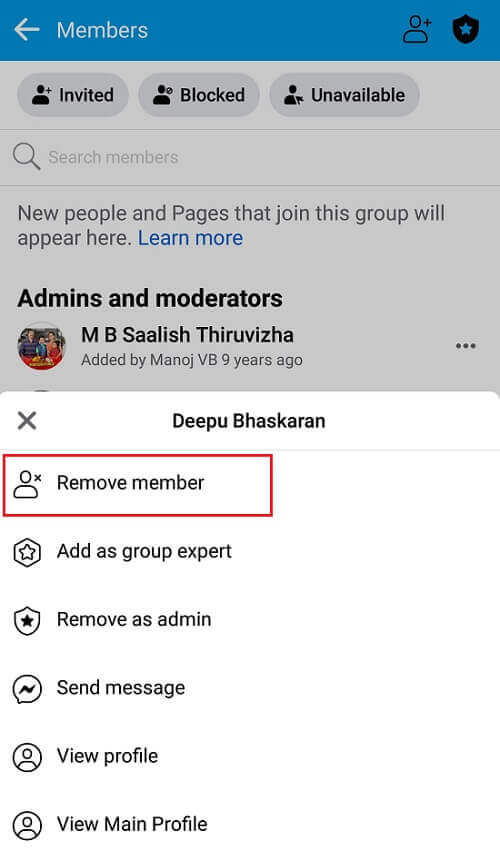
4. When finished, do the same for your account also.
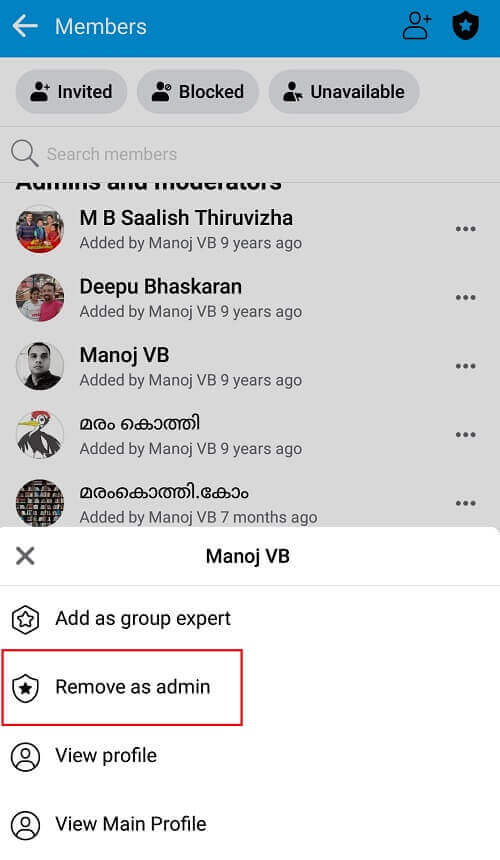
Firstly, you should remove administrator status (Remove as admin). Then, you can leave the group. As a result, the group will be deleted automatically. But members won’t get any notifications regarding the deletion.
How to Pause a Facebook Group?
Sometimes, you may need to take a break from maintaining the group and moderating posts. In such a situation, you can pause group for certain days or weeks. No one can add new posts, leave comments, and post reactions during the period. A message will be displayed on the top with the pausing notification.
Follow these steps to pause your Facebook group.
- Tap the three-dots icon on the top of your group.
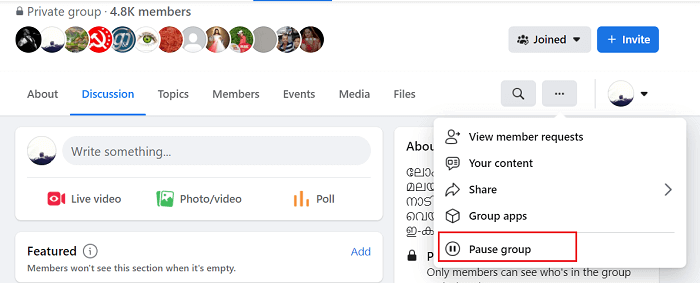
Choose ‘Pause group’ from the list.
2. Select a reason to pause your group. Click on continue. In the next step, Facebook will suggest some useful resources related to the topic you have chosen.
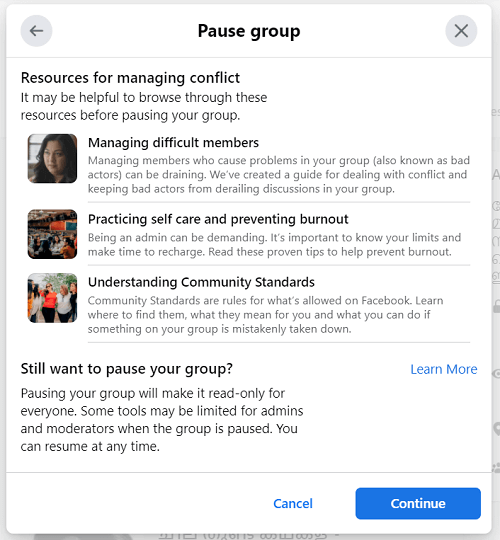
If you still want to pause the group, hit the Continue button once again.
3. Type a custom announcement for your members. It will be displayed at the top of your group. So others can know why the group is paused.
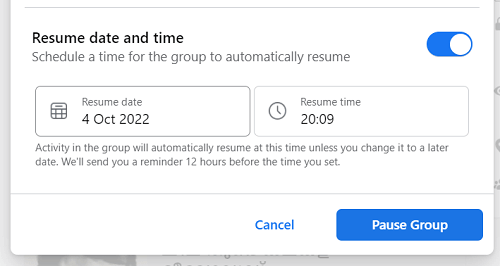
Set a date and time for the group to resume automatically. You can change it anytime before the scheduled time. Facebook will also remind you 12 hours before the operation resumes.
Hit the Pause group button to confirm.
Read Best Hootsuite Alternatives for Social Media Management [2024 Edition]


